Private homepage – Hans-Georg Michna
Global Positioning System
Hans-Georg Michna
Global Positioning System Information and Data for Germany and East Africa
Contents
Links
This project began as the Nature Reserve Waypoint Project and asked contributors to send in waypoints of track or trail junctions. However, nobody came forward, so the project existed only in the form of two of my own waypoint collections.
However, meanwhile a technical detail changed. Newer GPS receivers, now usually smartphones, have a much larger track memory, and so there is a new opportunity to revive this project under a new name with some decisive advantages over the old one:
So please join a new project to gather nature reserve GPS information. This is a collaborative project that aims at achieving a maximum of usefulness with a minimum of effort. The idea is that travellers record tracks. The names of all contributors will be mentioned in a list here, provided anybody volunteers.
You can take part only if you have a smartphone with suitable software, like Locus Free or My Tracks, or a newer GPS receiver with a big enough track point capacity.
Please send me an email when you need the tracks in a different file format.
Currently present are 7 nature reserves in Kenya, East Africa, namely Amboseli National Park, Lake Nakuru National Park, Masai Mara east of the Mara River, Samburu und Buffalo Springs game reserves, and the Tsavo East and West National Parks.
The links on the left side lead to incomplete, but convenient Google Maps renditions of the tracks for occasional, quick use on smartphones. The GPX File links on the right side can be used to download GPS files. They are complete and should be preferred not only for offline use.
| Country | Area | GPX File |
|---|---|---|
| Kenya | Long-distance driving (updated 2019-06, no tracks, only points of interest between the nature reserves. Google Maps Navigation has been working relatively well and may be a good choice, as long as you resist being led unto unpaved roads, except for the Baringo – Maralal – Samburu route, and are generally thoughtful instead of following its proposed routes blindly.) | kenya_driving.gpx |
| Kenya | Amboseli (updated 2019-06) | kenya_amboseli.gpx |
| Kenya | Lake Nakuru (updated 2015-05-31) | kenya_nakuru.gpx |
| Kenya | Masai Mara (updated 2019-06) | kenya_masai_mara.gpx |
| Kenya | Samburu (updated 2019-06. Note that Google Maps, with or without its satellite layer, shows most tracks in this area and may be a good choice as well.) | kenya_samburu.gpx |
| Kenya | Tsavo East (updated 2015-05-31) | kenya_tsavo_east.gpx |
| Kenya | Tsavo West (updated 2015-05-31) | kenya_tsavo_west.gpx |
In some areas, particularly Samburu, the Google Maps satellite map also shows many tracks, so check that as well, provided you have a sufficiently good Internet connection. If the tracks are clearly visible on the satellite map, they are often more complete.
To contribute actively, install Google's My Tracks program, Locus Map Free - Outdoor GPS, or any similar program that records GPS tracks, then send the recorded tracks to me, preferably in GPX format, but I can probably use any other common format too.
These tracks are incomplete and not recommended, but they are a quick and convenient partial solution.
To use these track maps in Google Maps, even on your smartphone:
Please send me an email if this does not work for you or if these instructions need to be amended.
Download the above GPX files before you lose your Internet connection.
Download and install Locus Maps Free - Outdoor GPS from Google Play Store or install any other mapping program that can show recorded tracks and waypoints provided as GPX files.
If you know a very good one that runs on the iPhone, please let me know by email, so I can add a recommendation here.
Import or open the GPX files you need and make sure they are visible on the map. For Locus Maps Free - Outdoor GPS put the files into the Locus/import folder and import them into the program's database for intensive use. Alternatively put them into the Locus/mapItems folder and activate them in the data menu for automatic import every time the program is started. That is a bit slower, but easier to handle. It is suitable for occasional or temporary use.
I will replace the oldest ones here with your fresh ones and mention your name in a list of contributors.
GPS (Global Positioning System) is one of the technical marvels of our time. See www.gpsinformation.net for the best source of general GPS information plus a very good collection of Web links and see www.trimble.com/gps/ for an excellent illustrated and animated explanation of how GPS works. More info can be found at the following sites.
GPS Tutorials
www.edu-observatory.org/gps/tutorials.html
www.trimble.com/gps/index.html
NAVSTAR GPS User Equipment Introduction
www.navcen.uscg.gov/pubs/gps/gpsuser/gpsuser.pdf
Also see
https://titleloanasap.com/gps-revolution-for-automobiles
www.gpsy.com/gpsinfo/
http://home-2.worldonline.nl/~samsvl/
www.best.com/~williams/avform.html
http://vancouver-webpages.com/peter/
Introduction
www.edu-observatory.org/gps/tutorials.html
www.Colorado.EDU/geography/gcraft/notes/notes.html
www.groenveld.de/pub/article.php?artid=148
(Very good, detailed article on the GPS fundamentals in German language)
Books and Technical Documents
www.navcen.uscg.gov/gps/geninfo/default.htm
www.nima.mil/GandG/pubs.html
www.navtechgps.com/
www.edu-observatory.org/gps/gps_books.html
Waypoints, Maps & GIS
www.edu-observatory.org/maps/waypoints.html
www.edu-observatory.org/maps/maps.html
www.edu-observatory.org/gis/gis.html
www.edu-observatory.org/maps/utm.html
On May 1st, 2000, the US made a surprise move and switched off the dreaded Selective Availability (SA) distortion of the GPS sattelite signals. This instantly makes all existing GPS receivers much more precise without requiring any changes or upgrades to the devices. With good sattelite reception we now get a position error of less than 15 m with a probability of 95%. The altitude error remains bigger than the position error by a factor of roughly 1.5 but has now become usable for many more purposes for which it was too imprecise in the days of SA. There are no plans to switch SA back on.
The best GPS receiver for most purposes is a smartphone, Android or iPhone.
In the descriptions and sometimes in the names of the waypoints you may occasionally find the following single or two letter abbreviations.
| Abbreviation | Meaning |
|---|---|
| N | North |
| E | East |
| S | South |
| W | West |
| NE | Northeast |
| SE | Southeast |
| SW | Southwest |
| NW | Northwest |
| L | Corner, approx. 90° |
| O | Roundabout |
| T | Turnoff, approx. 90° |
| U | U-Turn |
| V | Pointed Turn |
| X | Crossing |
| Y | Branch, other than 90° |
When both direction and graphical depiction are present, the graphical depiction always comes last.
Some of the approximately 350 east African waypoints may be inaccurate. Please do not rely on them too heavily and please try to verify or remeasure them and email me your results.
In addition, some of the east African waypoints are taken with a lower numeric accuracy or from unreliable sources. Many of the airport waypoints are up to one mile off, for various reasons. I found a few that were some 5 miles off until I corrected them. Sometimes the waypoint designated an airfield but was really positioned in a nearby town or lodge. In one case (Mt. Kenya Safari Club) an airfield waypoint turned out not to be an airfield at all but the mountain lodge itself. (Of course I have already corrected these, but some others will certainly still be inaccurate.)
Below you can download GPS-Waypoints for Germany and for East Africa with emphasis on Kenya and the surrounding areas. Most waypoints are intended for flying, and most of them are airports or airfields.
The Germany information was valid in the year 2000 and has been superficially checked, but not fully updated in 2002. There may have been a few changes meanwhile, so check at least those airports that you plan to use before you fly.
The Kenyan and East African waypoints contain some useful driving waypoints and routes (see description further down). The East Africa file is Kenya-centric, but contains a lot of airports farther from Kenya, reaching into the area E 25° to 45° and S 15° to N 15°.
The airspace files are for pilots and were apparently updated in 2010. Cross-check with current information before using them.
| Area | GPX (GPS eXchange format, XML), zipped |
|---|---|
| Germany | germany.gpx |
| Kenya driving | kenya_driving.gpx |
| East Africa flying | east_africa_flying.gpx |
| Kenya airspace | kenya_airspace.gpx |
| Rwanda airspace | rwanda_airspace.gpx |
| Tanzania airspace | tanzania_airspace.gpx |
| Uganda airspace | uganda_airspace.gpx |
Specific information for the Kenya and East Africa waypoints
Symbols
Airport = airport or airfield (Driving routes bypass the airfield,
sometimes at some distance. The airfield is often not visible from the
road.)
Telephone = reporting point
Short Tower = other significant waypoint, useful for routing
Skull and Crossbones = prohibited, avoid
All other symbols are not related to flying.
Nairobi area
All airports around Nairobi begin with NAI, e.g. NAIWILSON,
NAIORLY.
NAI-X = waypoints around Nairobi, such as access lanes, points on the control zone boundary, etc., in particular:
Waypoints
NAI-E1 = NE Access Lane Control Zone Boundary
NAI-E2 = NE Access Lane turning and reporting point
NAIEASTLEI = Nairobi Eastleigh airport
NAI-MO = Monastery reporting point
NAI-N = Control Zone Boundary north
NAI-NDULA = Ndula Marker
NAI-NW = Control Zone Boundary northwest
NAIORLY = Nairobi Orly airport
NAI-P3 = P3 prohibited area
NAIROBI = Nairobi International Airport
NAI-S = Control Zone Boundary south, area corner
NAI-S1 = SE Access Lane marker near Control Zone Boundary
NAI-S2 = SE Access Lane turning point, marker, reporting point
NAI-W = Control Zone Boundary west
NAIWILSON = Nairobi Wilson
MOM-NE = Mombasa control zone boundary near Mombasa Road
You can use Excel to load the text files and save them in different formats, like CSV. You can also use an editor, like the simple Windows editor, after that to replace commas with semicolons or vice versa for different national versions of Excel, because the data doesn't contain any commas or semicolons---these are only used as separators.
The following table defines the use of the symbols on the Garmin GPS devices. You can use these to delete waypoints by symbol on a Garmin GPS device or in the computer and thus separate the flying from the driving waypoints.
| Garmin Symbol | Use | Description |
|---|---|---|
| Airplane | Flying | Airport, airfield (Note that the cross symbol is originally meant to designate a medical facility, but is used here only for airports.) |
| Danger area | Flying | Prohibited areas, airports in prohibited areas; military airports (East Africa only, since military airports in Germany are usually open to civilian use), some unusable airports |
| Telephone | Flying | Listed, mandatory reporting point. For example, NAI-MO is the Monastery reporting point for the approach to Wilson Airport Runway 07. |
| Short tower or medium city | Flying | Orientation or navigation point, like some orientation
points on control zone boundaries, for example, NAI-NW is a point northwest
of Nairobi on the control zone boundary. Although you may have to report
crossing this point, I do not count it as a mandatory reporting point, as
it is an arbitrary point on the control zone circumference, not a listed
reporting point.
In MapSource files the medium city symbol is used only for medium sized cities, of which a few are useful as waypoints to navigate VFR corridors between controlled areas. Other navigational points have the short tower symbol. |
| Car | Driving | Branch, turnoff, road crossing, roundabout, car track, river crossing, gate, any other point that is important for driving |
| Gas station | Driving | Petrol station. Also sometimes used for lodges if they have a petrol station, because that is usually the more important information. |
| Residence or hotel | Driving | Building, for example a hotel or lodge |
| Campground | Driving | Camp site |
| All other symbols | Driving | Occasionally other symbols are used. They are only used for driving, never for flying. |
Special reporting points are available for the Nairobi Wilson northeast and southeast access lanes and some other places.
Northeast access lane inbound: NAI-N1 – NAI-N2 – NAIWIL
Southeast access lane inbound: NAI-S1 – NAI-S2 – NAIWIL
Prohibited area north of Wilson airport: NAI-P3
Points on the control zone boundary: NAI-N, NAI-NW, NAI-W
South corner of area 2 (if not using the southeast access lane): NAI-S
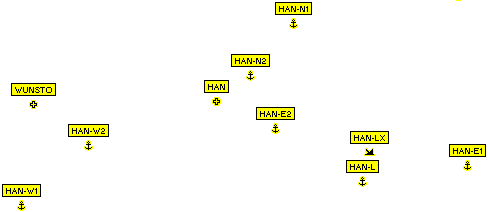
Mandatory reporting points for some German airports are similarly arranged, with the digit 1 always designating the outer reporting point of an access route. Occasionally, when an access route is curved and you have to turn at a point that is not a reporting point, I have inserted a waypoint at the turning point. Example: The Hannover departure route “Lima” uses the waypoints HAN – HAN-E2 – HAN-LX – HAN-L.
HAN is Hannover airport. HAN-E2 is a mandatory reporting point. Flying outbound, at HAN-LX you have to turn right (south) towards the next mandatory reporting point HAN-L, but HAN-LX itself is not a reporting point, only a course change point. Thus HAN has the + symbol I use for airports, HAN-E2 (like HAN-E1) and HAN-L have the symbol I use for mandatory reporting points, but HAN-LX has the symbol I use for other flying navigation points.
Here is the Nairobi Control Zone:

Nairobi Control Zone
The following table explains the east African driving routes. These routes are becoming obsolete and are being replaced by the tracks listed above and by the navigation capability of Google Maps. They are still explained here, just in case somebody wants to try them.
The routes beginning in Nairobi all use a shortcut from the western part of the city. If you start on Uhuru Highway in the center of the city instead, then you can simply drive north on Uhuru Highway through Westlands and continue straight in the direction to Naivasha and Nakuru until you meet the route. All routes use the turnoff to the old road down into the Rift Valley to Mai Mahiu, because this road is currently in a good state and more beautiful than the new road to Naivasha.
| Route Name | Description |
|---|---|
| NAI-AIRPORT | This is a very simple route leading you from Nairobi city to the international airport. It can be useful when you are there for the first time or have to drive this route at night, because the turnoff from the Mombasa road can be missed. |
| NAI-BARINGO | This route leads you from Nairobi via Naivasha – Lake Nakuru to Baringo. |
| BARINGO-SAMBU | This route leads you from Baringo to Samburu Lodge through
the Samburu West Gate. From there you can use the next route to lead you
back to Nairobi (or you can, of course, drive along any of the straightforward
routes on either side of Mt. Kenya that are not represented here).
Note that this route bypasses Maralal. Unless you want to drive the entire distance from Baringo to Samburu in one day, you should turn off to the north in Kisima and spend one night in the Yare Camel Club or in Maralal Lodge. The Maralal Lodge waypoint is still missing in my database. Please email it to me if you were there and got a waypoint. |
| SAMBUL-MWEIGA | This route leads you through a shortcut in the direction
of Mweiga, suitable especially when you want to visit The Ark or Treetops.
It continues to Nairobi.
The waypoints SAMBU2 through SAMBU7 show a shortcut out of Buffalo Springs National Reserve, bypassing the gate, which is only drivable when it is dry. Do not try to shortcut this route by bypassing SAMBU2. It appears easy, but there doesn’t seem to be any suitable track there. If you don’t want to reach Mweiga, you can still use this route, but ignore the branch towards Mweiga and instead continue to drive on the main road until you rejoin the route. The route ends on the fifth roundabout in Nairobi, avoiding the difficult and possibly unsafe areas further south. The last bit has no waypoints, but you can simply drive towards the end point of the route as you like, and you will end up on that roundabout. |
| NAI-AMBOSELI1 NAI-AMBOSELI2 NAI-AMBOSELI3 NAI-AMBOSELI4 NAI-AMBOSELI5 | Routes from Nairobi to Amboseli Lodge
NAI-AMBOSELI1 is the normal path, usable after moderate rainfall, but quite rough and partly corrugated. NAI-AMBOSELI2 is a much nicer and also a bit shorter track through Maasai country, but it is usable only when it has not rained heavily for at least one month. NAI-AMBOSELI3 leads through Lake Amboseli, is even shorter and faster, but is only usable when it has not rained for at least one month and when the lake is totally dry. NAI-AMBOSELI4 is a slower (6 h), but beautiful and interesting route via Kajiado – Imaroro – Mashuru – Osilalei (Selengei River) – Lenkisim Mission into Amboseli and then inside the nature reserve to Meshenani Gate. (There is no gate on this road. You have to turn right inside the Amboseli nature reserve and drive to Meshenani Gate to pay your entrance fee.) In 2004 there were deep gullys on the last bit that leads almost straight to Meshenani gate, requiring a relocation of that route further to the north. If these gullys grow, you may either have to drive even further to the north or avoid the shortcut and drive straight south until you hit the main road, then turn right for Meshenani Gate. I would like to know what happens if you drive this route backwards, but do not take the steep turn into the loop leading back to Osilalei. I expect that you will hit the main road somewhere near Selengei. Please write me if you tried this and please send the missing waypoint. NAI-AMBOSELI5 is the preferred route since 2010, if you want to reach Amboseli as quickly as possible, as much of it is excellently paved, and the remaining gravel track is still relatively good. However, you end up at Iremito Gate, where you cannot purchase or load the KWS smartcard. On arrival, you probably have to drive to Meshenani Gate inside the park over a rather poor, stony track to solve this problem, then back again the same way, unless Lake Amboseli is dry enough to drive right through it. |
| MAASAIMARA FI | This route leads you from Nairobi along the new road (shortest
way) to Masai Mara Fig Tree Tented Camp.
Don’t miss the turnoff at waypoint NAINAR onto the old Naivasha road to Mai Mahiu. You have to turn off to the left and drive down a spectacular road into the Rift Valley. When you go from Nairobi to Masai Mara, ignore the waypoint MMARA4. It is only useful on the way out of Masai Mara if you want to use a shortcut to bypass Sekenani Gate, because the track through this waypoint leads to the little village just outside the gate. This way is shorter and allows you to save the time spent at the gate. It is not useful when you enter the Masai Mara National Reserve, because you have to pay the entrance fee at the gate. (Do not try to sneak in. We want to support Kenya’s nature reserves, and the tickets are often checked inside the reserve.) MMARA4 is a river crossing, which may be too deep and not usable after rain. The normal way between Sekenani Gate, waypoint MMARAS, and Fig Tree, waypoint FIGTRE, is a slight arc to the west, as the straight line may cross into somewhat difficult terrain. Besides MMARA4 there are currently no waypoints in the area, but unless you are very short of dailight time, you can always get out of difficult areas by driving further to the west. AITON1 is a turnoff into the bush from which you can drive northward to AITON2 (not in this route) on the Aitong road. The first part of this route is very beautiful and leads through pristine bush land with many animals (albeit shy), suitable for camping before you enter Maasai country, if you are careful and avoid camping too close to the Maasai. However, this is a long detour, and the Aitong road from AITON2 to Fig Tree has been destroyed by rain during the El Niño years up to 1999, thus the way is even longer and now extends close to the river Mara through another beautiful area used for game drives from the nearby lodges and still outside the Masai Mara reserve. If, against all odds, you want to try this track, plan for 6 extra hours and never try to go anything but north on average until you reach the Aitong road, because all westerly tracks end near unpassable rivers. |
Here are some thoughts on an emergency that can happen in a light aircraft when flying VFR and have a handheld GPS on board. Assume, for example, that you are flying VFR on top and your single engine fails. Another case in which a GPS can help might occur if you get trapped in clouds, but there you still have your engine at least, which makes it easier. Still the GPS can help.
In IFR-equipped aeroplanes you have very nice things like a big screen GPS, a flight director, etc. In a single engine plane with just a handheld non-aviation GPS you have much less, but with some ingenuity it should still be possible to fly some kind of workable approach.
Obviously, if you have a moment of time, you should declare an emergency immediately and keep telling the controller what you’re up to.
Assuming that you loaded at least all airfields near your planned route into the GPS receiver, you can quickly find the nearest airfield.
For simplicity the calculations and examples assume a (slow) gliding speed of 60 kt, because at this speed the numbers are very simple. If you really fly 70 kt, don’t worry. All our calculations cannot exactly account for your particular case anyway, so we are calculating roughly correctly and assume a sink rate of 800 ft/min. All heights are above ground, so with the common QNH altimeter setting you always have to deduct the height of the airfield from your altimeter reading.
Use the suitable special features of your GPS. For example, the Garmin GPSMAP 60/76/96 C/CS series has display fields for sink rate and sink rate to destination. Have these activated before you even take off. If you clicked on your desired emergency destination, then on Go To, and see that your required sink rate to destination is lower than your actual sink rate, you know you won't make it, so you have to do something.
Assuming that you don’t have much spare distance to soar and therefore have to try to make it to the airport without flying around aimlessly, but you still want to fly at least a short, straight final approach, one method could be this:
During all this quick maneuvering never forget to keep your speed at the proper approach speed. You don’t want a stall-spin accident now. And keep in mind that 1,000 ft too high is pretty bad, but still better than 10 ft too low.
If your directional estimate turns out to be inaccurate, you will notice after turning in that your flight direction is not exactly equal to the runway direction. If you have some extra height to lose, turn again to compensate for the discrepancy and fly an S-like course that ends again in the runway direction. Of course, as soon as you’re no longer perfectly sure that you can make it to the airfield, immediately turn in and fly directly towards the airfield.
You should never need this procedure when your engine is still running, but in the unlikely case that you do have to make something like an instrument approach on a handheld GPS, lower the required heights above ground to some 600 ft per nm of distance, which corresponds roughly to a 6° glide angle.
That’s a rough plan, but you may find that the mere thinking about it will prepare you for such an occasion. Let’s hope it will never happen, but be prepared anyway.
For general information on geocaching please see www.geocaching.com. The listing of this geocache on that site is here. For more information on travelling in Kenya please see http://michna.com/kenya.htm. For travel reports please see http://michna.com/kenya2019/ and others.
This is a description of the first equatorial divine (a fun abbreviation of “dividing line”) geocache, i.e. the first geocache placed where an integer meridian crosses the equator, which is at the same time the first virtual geocache. The coordinates are N/S 0° E 36°. Later these points were named, "confluence".
Due to the people who live in the area, it is not possible to actually stash away anything. Thus we have the first virtual geocache now. Approx. 40 m to the south of the meridian-equator crossing there was a tree, unfortunately now felled.
Whoever sends me an email with a credible description of the place will get entered into the virtual logbook for that geocache, published below.
A small hint—at first I went there the hard way, by pointing my jeep straight towards the point, off about 90° from the nearby main road, and driving straignt towards it. It’s only a few kilometers, but it took me hours of rather difficult driving including turning back once and crossing a river, where I had to drive through the water, then up a steep slope such that I was seriously worried about the jeep falling over backwards.
After finding the place, it turned out that there is at least one easier way to get there. Getting back to the road took me much less than an hour. A good map would help. So don’t do it the hard way. The shortest way is not always the fastest.
Twice I found it impossible to reach by car after it had rained.
But then I don’t expect this geocache to be found all too often, if ever. (Now that it has been found already several times, my preceding sentence, of course, looks overpessimistic.)
Since 2019-06-01 a sign is there, reading, "N0 E36". If you find the cache, please let me know by email whether the sign is still in place. People might take it away.
The virtual geocache logbook is here:
| When | Who |
|---|---|
| 2000-06-15 | Hans-Georg Michna created the first virtual geocache. |
| 2002-02-27 | First finder: KLifeDad, alias Dan, along with two missionaries
and one visitor from the US.
Finder’s email with my comments added in cursive text in brackets: Date: Wed, 27 Feb 2002 12:55:30 EST YOUR CACHE HAS BEEN FOUND!! The team that visited the site said the message was [text of marking withheld, it was correct]. The team also wanted to be sure to tell you that they spent time carving on the message to make it deeper. There were some additional scratches at the bottom of the tree but they don't think it was a message. [Indeed I didn't add any further markings below, just the obvious one.] They took a picture just in case. We'll forward photos to you -- hopefully this weekend! Thanks for a GREAT adventure. Following is the write up that Dan (KLifeDad) composed for the adventure: This find is dedicated to KLifemom who has been the driving force behind our family getting into geocaching. Due to the remoteness of this site there was substantial effort involved. Because Klifemom wasn’t able to come along I thought it would be appropriate for me to put a picture of her on the tree –thus the world’s first virtual geocache had the world’s first virtual visitor. Accompanying me were two missionary friends, and another visitor from the US. We left Nairobi and traveled to Lake Naivasha to spend the night. We had reservations at a place called Crater Lake. The last 8 KM were VERY rough. The road had deep ruts (6-10 inches) and was thickly covered with volcanic dust. The only directions were a hand lettered sign about 5 KM from the entrance. When we got to the hotel there was another hand painted sign pointing to a Snake Farm. Several Africans materialized to take our bags and we began along descent into a crater. The surroundings were just amazing. There was a 5 acre lake with flamingoes on it, and about 15 huts that were very luxurious. The setting was just breathtaking, and the service was impeccable. One of the things they asked us before we went to bed was what time we would like to have coffee set out on our patios. The only warning was that we should be sure and get the coffee, otherwise monkeys would grab the bowls of sugar and make off with them. The next morning we took off and stopped at Lake Nakuru for lunch. Based on the warning of the difficulty of reaching the site I had pored over maps, and we were able to get quite close. There is a huge sisal (hemp) farm around this cache so we got within about 2 miles of the site, and then began driving down rows of plants. We passed an African who just stared at us (4 white men in a 4 by 4). The African asked us in Swahili where on earth did we think we were going. My missionary friend knew enough of the language to understand the question, but didn’t even attempt to explain geocaching. We got within ¼ of a mile and finished the journey on foot. They had been burning grass around the tree, and we had no trouble finding it. On the way back we were walking through grass that was about a foot high. I stepped near a snake and saw the grass rippling as it took off. Since we had just seen a green mamba at the snake farm I was very paranoid the rest of the way back to the car. We continued our trip up to Lake Bogoria where we spent the night at a nice hotel. That evening hippos came up to within 100 feet as they grazed on the grass. There was no fence between us and the hippos, so it was quite an experience. I bought the missionaries a GPS of their own as a gift, and one of them is going to be planting some caches, look for Kenya to have more caches in the future. This was an awesome trip, incredible scenery, and the opportunity for old friends to reunite. Thanks to Hans for the great cache, thanks to Klifemom for encouraging me to make this trip. [And KLifeMom, alias Dee Anne, later wrote:] Thanks again for an incredible journey. I can't wait to hear Dan's stories, and see photographs! Your creativity and the cache you placed impacted the lives of 4 men in a very positive way. They renewed friendships, tested adventure and courage, and created wonderful memories. |
| 2002-05-12 | Second finder: Carlson in Kenya. He writes:
I was one of the venerable four who found this site. Our powerful 4-wheel drive vehicle was not even challenged with destruction as we parked it and walked the last 1/2 mile through the thick grass and towering hemp plants. Maasai with their herds of cattle milled around. The air was hot but clear and clean. The intense equatorial sun made its presence and power known. There at the esxact spot designated, we found the mark. After due photos and water vortex experiments we walked back to our trusty vehicle and drove North for a delightful stay at the nearest hotel (not too near). Check out what is going on up there before you go as the local tribes are frequently at war over the land and whose cattle is whose. Howard Carlson |
| 2003-06-16 | Third finder: BumBum (Jörg Müller) from Germany, riding
a bike through Kenya. Please see
http://mitglied.lycos.de/bumbumbike/
(German language web site) for more information. He writes that he found the cache on the shortest way directly from the junction, cycling the mud road towards Bogoria. Where the river was near, he went right into the sisal plantation. But the whole area was flooded, and he had to cross a stream. The area around the cache was completely, 30 cm, under water. There were a lot of cattle around, but no herders. I admire his persistence—I had given up twice in similarly wet situations. |
| 2004-11-11 | Fourth finder: Jurjen & Mike, Nightfire, from the
Netherlands. One of them writes: The last cache that I wanted to do in Kenya. I found this cache yesterday around 11:30. We took the matatu to Mogotio and from there we walked to the cache. It's a walk from 6 km, a very nice walk. It was a long time ago that somebody make the message better visible. This was the reason that we could not see the whole message. We make the message more clear for the next customer. The idea of the cache is really good! We enjoyed the cache. Thank you very much for this cache. Jurjen & Mike P.s. I took a lot of pictures, I will put them on the internet on the 16th of november (then I am back in the Netherlands). The site is http://nightfire.geocacher.nl/ . |
| 2009-01-19 | Helmut Resch and
Babs Coleman were only
the third regular
visitors to the 0°N 36°E confluence, but apparently were not aware that the
tree only 40 m south, which they apparently even photographed in their
photo #4,
hides this
virtual geocache. I'm no longer absolutely sure about the tree photos, because this one looks different from the one in the geocache listing, which somebody else took. Anyway, the nearest tree bears the cache. |
| 2011-07-30 | Fanny –
Toppluvsmonstret from Sweden, the fifth finder, wrote: Found the tree! After a long car drive we got there. All the others were really excited. It was my taxi driver, three of my kenyan friends and one other friend from Sweden. We didn´t see the inscriptions first and looked at some other trees, but then my friends screamd that they have found it. When we got back to the car we had get a flat tire, but Titus, our taxi driver, fixed it quite quickly. =) TFTC /Toppluvsmonstret (Sweden) |
| 2012-01-28 | Ondřej Beránek, the sixth finder, wrote:
I have planned the access route according Google Earth, and it looks almost like a drive-in cache (see attached picture). I got by car ca. 350 m close, and then I walked straight to the cache between the sisal plants. |
| 2012-06-15 | cache bonus came close, but did not quite get to the actual confluence, because he was in a tour group and because there had been a lot of rain. Read his log. |
| 2012-08-02 |
Klara&Werner also came close. They wrote:
We went to the Rift Valley on 2.8.2012 and we really tried to reach the cache and drove into the sisal plantations, but the road became so muddy, that our car was just sliding. So we finally returned back to the main road as we could not really reach safely. To go by foot, we didn't have the time, as we still wanted to reach Nyeri the same day. We will add a picture to proof it when we will actually log the cache—but now it is up to you to decide, this is a Found or a DNF. Thanks It is an almost-found, I would say. Unfortunately this one is really hard to get to when it is wet. In any case your effort is appreciated. |
| 2015-02-15 |
DuneBuddy found it and published his story and photos
here. Please read! He is only the seventh finder. Unfortunately he found that the landmark tree near the confluence had been felled, so the place is now nondescript. I will see what I can do when I will pass by there again. |
| 2018-02-27 | Der_Holzmichel (report) and Die_Holzmichelin (report) found it as the eighth and ninth finder. |
| 2018-05-01 | RolandC found it during the long rains, which impresses me very much. He is the tenth finder. His report is here and contains a range of very interesting photos. |
| 2018-05-16 | Again in the depth of a particularly intense rainy season the two fearless geocachers Nawesmake and MzunguDeb found the cache as #11 and #12. Their reports and their photos are quite impressive. Please see them here and here. The cache has now been found 12 times in 18 years. |
| 2018-08-29 | Wolf64, Blazek, and Beckersche found the virtual cache while driving all around Lake Victoria. Wolf64 wrote this on geocaching.com. Congratulations, #13, #14, #15! |
| 2018-10-23 | TheLoneBaker found it as #16 and took a series of photos. Thanks! |
| 2019-05-01 | Vader&zoon, #17 and #18, went there and also took a whole range of photos. One month later I went there and erected a sign, saying, "N0 E36". |
| 2019-12-11 | roadrunner1985 (Bastian) und seegurke88 (Samira), #19 and #20, made it in spite of rains. They took several photos and said that apparently the N0 E36 sign has already gone. I will try to bring a new one. |
| 2023-04-05 | Proton26, #21, found it, took a photo, and wrote: "On the way from Mt.Kenia to Kisumu we left the route for this cache. My daughters weren't happy about this additional time. Thanks for this old cache on a confluence point!" |
Please measure the waypoints again if you pass by and let me have your coordinates, so the accuracy can be improved. Of course I am always interested in more good waypoints and routes. Please click on the E-Mail symbol below to send me mail.
Private homepage – Hans-Georg Michna

hits since 2007-11-01
Free PHP scripts by PHPJunkYard.com